Friday, November 30, 2012

Magnetic To-Do List with Chalkboard Tasks

So last time we talked about the amazing things people are doing with chalkboard paint, and how to make your own for cheap. Now I shall share with you the project that I had in mind for those little chalkboard buttons I made.

The Need

I've been very busy lately, and it has predictably made me forget about some important things I had responsibility for. I can't stand when that happens, and so from this need arose a great idea (eventually)!

First I tried making a simple to-do board, the type where you put paint sample cards inside a frame and use a dry erase marker on the glass. (my inspiration for that came from ImperfectHomeMaking, here)


Effective and cute, but just not fun enough for me. I didn't just love looking at all the tasks I had to do.

I needed something even better!

Idea

So about a month ago, I had a vague idea of a to-do board that I would love to create. It basically combined two ideas I've seen on Pinterest; magnetic makeup boards and chalkboard paint.

Finally a couple weeks ago I fleshed it out on paper, and got straight to work!

Now bear with me as I share my dark pictures with you (my mom's house does not exactly have picture-quality lighting.)

Steps

Here is a little far away look at the finished project... remember to imagine it in much more vivid colours than the picture shows, even though this part is mostly grey.


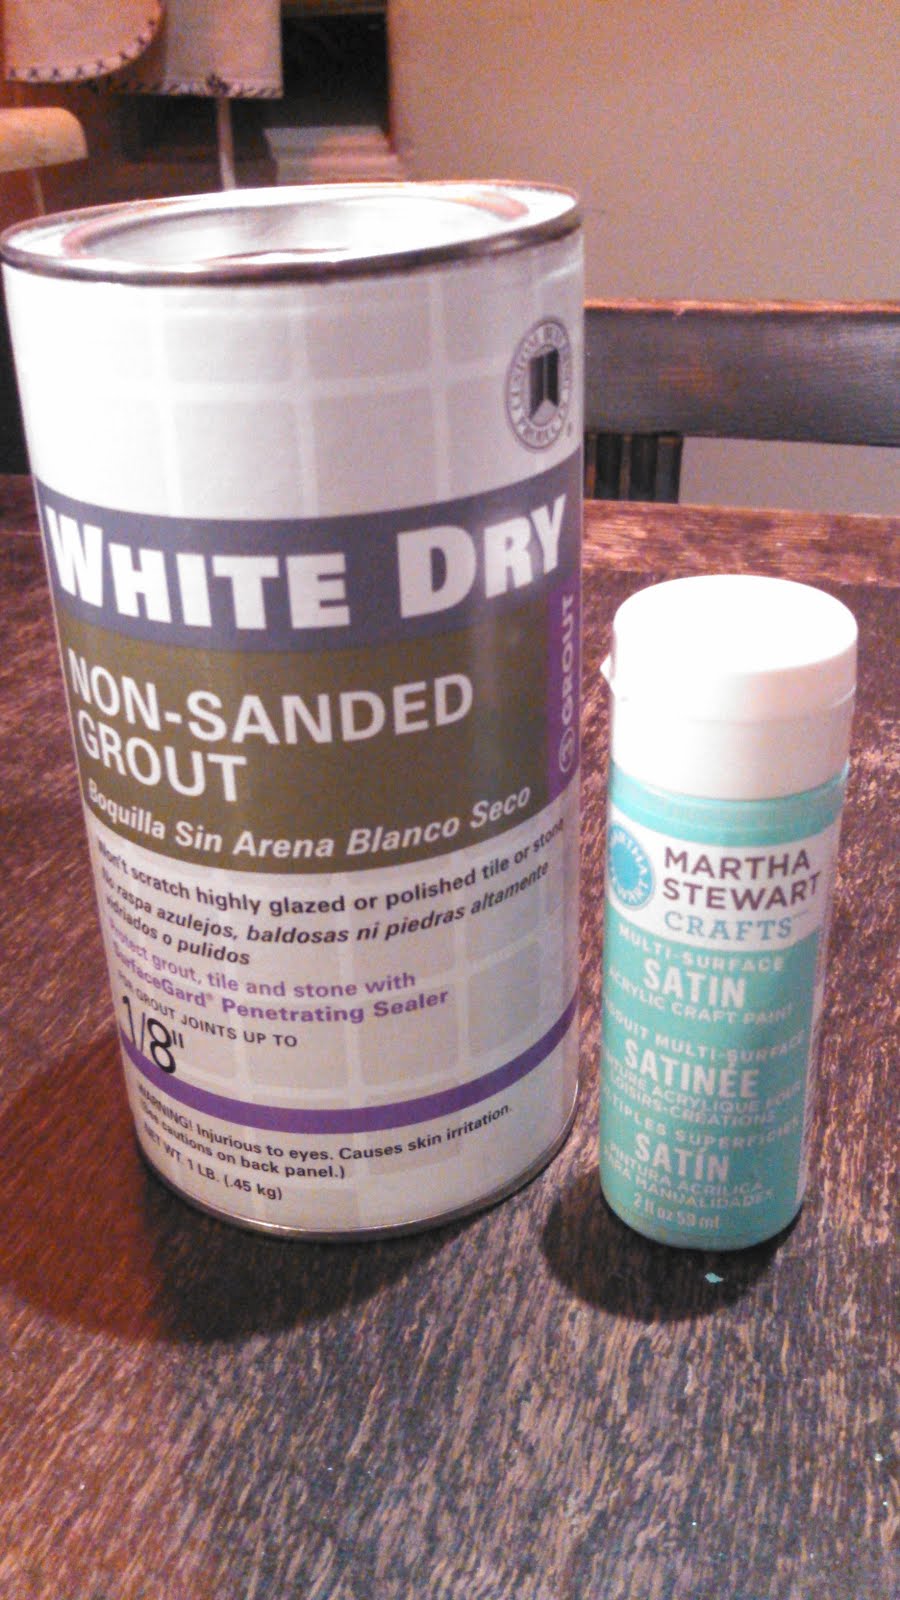
Step 1. Buy Supplies

This was done over the course of several days, as I wasn't sure all at once which colours I wanted. But, I ended up with:

  • Wooden shapes in rectangle, heart, circle, and star
  • Chalkboard paint, made from scratch, in blue, green, grey, and purples
  • Wooden border, as you can see above
  • Black paint to cover said wooden border
  • Sheet of metal from the local hardware store
  • All-powerful rusty clippy thingy from my Dad (more on that later)
  • Chalk marker
  • Sample swatch of fabric from Joanne's
  • Purple ribbon
  • Pack of magnet circles
  • Hot glue gun

Everything is from Michael's unless it says otherwise, because Michael's understands me and my needs.

Step 2. Cut the Metal Board

The metal sheet I bought was just about an inch too large for my frame, so I had to cut it down. Not something I was looking forward to, but luckily my Dad had a large clipper that I'm told was made for this job. So after only some minor hassel, I had snipped my sheet down to size, never ceasing to be amazed at how strong those clippers were.

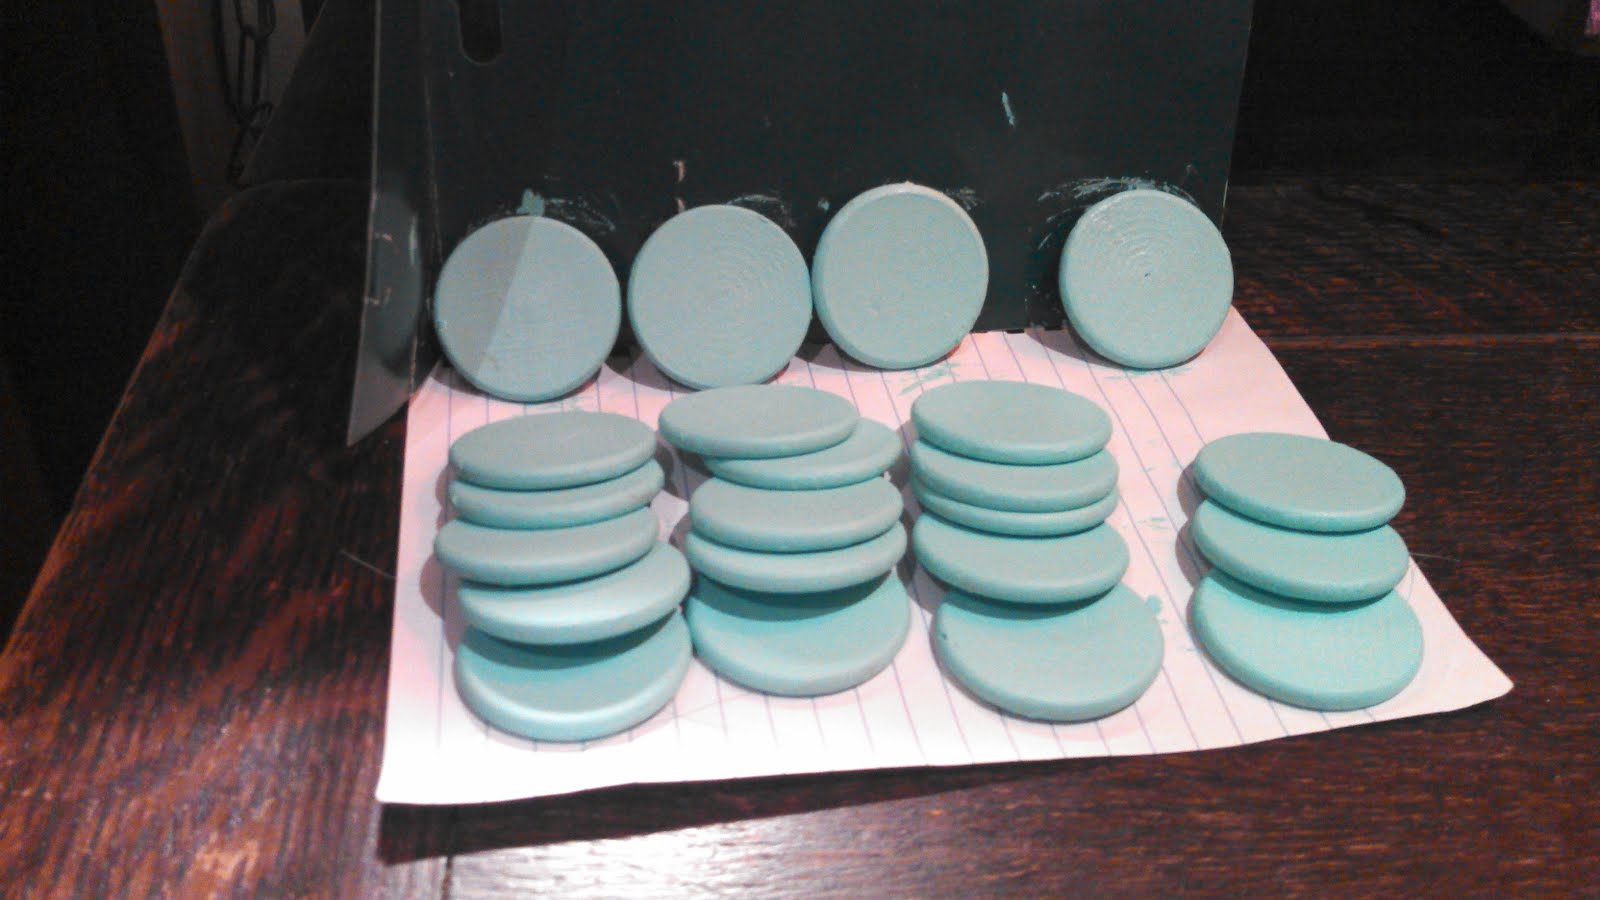
Step 3. Cut Shapes to be Painted

I wanted to end up with squares, not the rectangles I had to buy. And so, I used the metal clippers! Wow. Once again, they made my job so easy. After just a few minutes, I had lots of mostly-straight squares, plus a few smaller rectangles that I needed.

Step 4. Paint Shapes

For all this excitement, see previous post.

Step 5. Magnets

As I was in the store looking at magnets, I was disappointed at how much they cost for even a small pack of 50. But wait! Those 50 circles, although small, were much larger than I needed. So I bought them and snipped them in half with my magic clippers. Hooray! 100 magnets for the price of 50.

I had to attach the magnets, so then it came time to open my new purple hot glue gun. Man I hate those hard plastic packages they come in... metal clippers to the rescue, hooray!

After all this snippy clipper fun, I chose the ugliest side of each button, and hot glued on a magnet.

Step 6. Attaching the Fabric

This step was easy enough. I just pulled the fabric tight on the metal board, and hot glued the edges to the back. Nothing too exciting there.

Step 7. Attaching the Ribbon Dividers

As you saw in the picture above, I decided to use ribbon as a divider between days.

I practiced first with some yarn I had lying around, arranging and rearranging until I was sure of the placement I wanted.

Then I cut each ribbon one at a time, attaching as I went. Each ribbon has its ends hot glued to the back of the board.

Look, I got my camera to absorb some light... once.

I had some trouble keeping them straight as I flipped the board around to glue them. It took until my second-to-last one for me to discover that it is easiest if you just quickly stick a piece of temporary tape on one end. Duh.

Step 8. Paint the Border

Again, another easy step. I layed down some newspaper and painted the board, waited for it to dry, and painted the other side. And of course, got absolutely none on the floor in this process.

Step 9. Attach the Board and Frame

Here's where I needed a few of those scraps of rectangles I ended up with. This frame I bought was not an actual picture frame, so there was no way to just slide my board inside. Thus, I had to get somewhat creative.

I marked exactly where I needed the board to sit on the back, and started hot gluing pieces onto the border in the general layout of a picture frame back. I ended up with strips of wood to support the bottom and sides of the board. Then, I hot glued strips on top of these supports, reaching from one to another across the board to keep it from just tumbling backwards.

The top edge I left empty, so I can slide the board out if I ever need to. But other than that, the board can't move in any direction.

Step 10. Make "Permanent" Buttons

That would be the day-of-the-week rectangles you saw in the first picture. I say "permanent" only because I won't be changing them often, but they are of course still capable of change.

Implementation

Alright! Done! My board was ready to be customized.

So, let me explain a little bit how I will put this to use.

  • Each button shape is for a different type of task. Squares are recurring, circles are one-time only, stars are for a specific time, and hearts are in case my partner wants to add something for me to do.
  • An obvious tip: I lined up the days so that the usually task filled ones are in a large space, and those with little task time have small spaces.
  • I will be picking tasks off the board as I go. At the start of each week, I will fill out my entire board with everything I know needs to be done. The squares will stay written on and will only need to be reassigned to their respective days, the others will be erased and new tasks will be written upon them as they come up.
  • I'm trying to think of some type of reward at the end of each week/two weeks/month or whenever. However, I'm trying to think of a prize that won't be ridiculous or expensive to maintain... I haven't thought of one yet, but if I do I will mark off a new space for it.


    Then I will decide that I get the reward at the end of a certain time period (if all tasks were completed), or when a certain number of tasks have been completed.
  • I'm going to have to make a cute holder for my unused and completed buttons, plus my chalk marker. For now they are sitting in a Michael's bag, and as much as I love the store, the plastic bag is just not exciting to dig through.

Remember; think in vivid colours!


So, I think I managed to explain that well enough. Any questions or confusions, let me know!

And share with everyone the kinds of things you do to keep track of your life's tasks!


Tuesday, November 13, 2012

DIY Chalkboard Paint

Oh boy, I'm super excited right now. I have a great project in the works that I will share with you soon, but until then, I'd love to show you my homemade chalkboard paint!

This paint is for the project I'm working on, but it deserves a whole post of it's own. If you've been around the right sections of Pinterest (or some other site, I'm sure) you'll notice that people are getting crazy with chalkboard paint.

But what is a girl like me supposed to do when she doesn't want boring black chalkboard paint?

Luckily I had found the answer to this dilemma beforehand. I thought I had seen something on Pinterest about just colouring chalkboard paint, but I went to look at it turned out that I was supposed to just make my own.

Uh-oh, I thought. I don't have time for this right now.

But then I read the directions:

Mix unsanded grout with whatever colour acrylic or latex paint you want in a 1:8 ratio. Paint your intended object. Done.

Alright, I got my excitement back! So I rushed off to my local building supply shop the next day. I expected I would have to buy a huge tub of grout, but actually I got a little thing of it for only $3! And by little, I mean will last me through about 2000+ batches of chalkboard paint.

My paint destination was Michael's, as I did not want to buy giant cans of latex paint from the building supply store. People online seemed to have enough success with acrylic paint, so I went straight to the Martha Stewart section. She actually makes chalkboard paint of her own, and it comes in 4 different colours, but I had decided I wasn't going to cheat. Besides, I wanted a purple, which she didn't offer to me.

After a flurry of grabbing bottles and enduring massive indecision, a bored-to-death boyfriend, and a second and third trip back to the store, I ended up with the colours I wanted. Finally!

Now I won't bore you with the accounts of my paint jobs, but let me just give you a few photos and tips:

Grout and some paint!


Nice paint consistency


Coat 1 of 2


Coat 2 of 2


- Mix the grout you are using with a little water to remove the clumps, before mixing with the paint.

- Even if you only need a tiny batch, I would suggest using at least 1/4 tsp. grout to 2 tsp. paint.
  Any less, and my paint was drying and clumping quicker than I could use it.

- Don't get too much paint on your brush when you are painting small objects... should be a given,
  but I had to learn that lesson the hard way. Multiple times.

- I was able to use Martha Stewart's acrylic paint with satin, pearl, and metallic finishes with no
  detrimental effects (although I'm not thrilled about how pearl turned out) Oh, the possibilities!


Sorry not a great picture... looks better in person.


Any of you been doing anything with chalkboards? Let me know!


Wednesday, October 31, 2012

31 Days off Your Duff {Day 31} - Rolling Perfect Pinwheels

I don't know about all of you, but my sister said she is terrible at rolling pinwheels. Just terrible.

This past Saturday I had to make nearly 200 of the little guys, so I got pretty decent. Here are the two main tips I picked up!

Quality or Quantity?

Since I was making these in bulk, I was definitely going for quantity here. And using super-huge tortillas, I got about 15-20 pinwheels out of each one.

If you are going for top quality though, I'd say expect about 4 perfect ones, or 6-10 good ones total.

Stuffing and Rolling

No matter what quantity you want, you won't be using the very ends of the roll, so don't even bother putting ingredients there. I left about 1.5-2 inches free on either end.


Fill with whatever other ingredients you desire, and it's time to start rolling! Grab the right or left side and start as small as possible.

Tight, tight, tight. Make it as tight as you possibly can. Don't worry, you won't over do it; it is, however, incredibly easy to under-do it.

Once I got the hang of it, my pinwheels started to have five layers of tortilla. Well, the ones from the very center of the roll did; the farther out you get, the less tortilla there will be. That's just what happens when you make a circle into a tube.


Fairly decent, right? I'd say so.

Now don't be scared to make these yourself, as my sister is. You can easily whip up a big batch of these in a party emergency! And you can make them fancy too; I really have the urge to try some smoked salmon ones.

Now that you've been off your duff for most of the month, don't give up! Keep trying new things, enjoying life, and making things for yourself!

31 Days off Your Duff {Day 30} - Tuna & Apples

I wanted to share with you all the strange combination of sandwich I discovered a few weeks ago.

Of course, the title gave it away, so it will come as no shock to you when I say the sandwich was: tuna and apples.

I was about to take a tuna sandwich to volleyball, and my mom suggested I take an apple with me too. We each thought,

Huh. Tuna and apples sounds strangely appetizing...

And so I tried it. I ate my tuna sandwich with sliced up apples inside. And it was indeed delicious!

Don't be afraid to try strange foods together. You'll be right more often then you'd think.

Other Sandwich Combinations

Well, seeing as how that was such a boring post, I'll tell you about a few of my other favourite sandwich toppings that I don't see enough of.

Egg Salad w/ Green Olives

I don't understand why this isn't considered just normal. Deviled eggs have green olives; why don't egg salad sandwiches? They are basically the same thing!

[Insert meat} w/ Vinegar

I don't like lunch meat very much, but on the days I am desperate enough to eat it, I love drizzling on some vinegar.

[Insert meat] w/ Kale Chips

Nothing adds excitement to an otherwise boring sandwich like the crunch of chips! I think I saw in a movie once somebody adding potato chips onto a sandwich. Of course, where there are potato chips, there should be kale chips!


Alright that's all I've got right now. Why don't you tell me about your favourite sandwich toppings?

31 Days off Your Duff {Day 29} - Lemon Thyme Tequila Spritzer

This is an amazing drink I made over the summer. I got the recipe from Sarah (who got it from Kelly Brisson at The Gouda Life) at Taste of Home. I think I fell in love with the both of them the moment I tasted these drinks.

Don't look at my pitcher. It's boring and my computer won't let me crop it out.


Now, as much as Sarah told us that she likes cocktails, she still just didn't convey how delicious these are. And neither can I; you'll have to try them yourself.

I say this now because the recipe I'm about to give you is for 1 pitcher, which just isn't enough of this incredible drink. You should go ahead and quadruple it... and then lock yourself in your home, put on some BBC Sherlock, and gulp sip away.

Ingredients

- 5 Lemons
- 1 package of fresh Thyme sprigs
- Sparkling Water to fill your intended container(s)
- 1/2 a cup of Tequila
- Ice
- 1.5 cups of Granulated Sugar
- 1.5 cups of Water

There is at least one commentor who says these drinks are too sweet, so she cuts down on the sugar. I honestly can't remember if I just followed the recipe exactly or not... I believe I did, and I liked how they turned out. But, I do not particularly enjoy the taste of alcohol, so I'm a little biased.

Now to Make...

Alright, do you have all your ingredients yet?? I'm so excited! Hooraaaay!

First, calm down, lest you burn yourself in the next part.

Now, you need to make the syrup that will give your drink its yummy flavour.

So grab a medium saucepan and put in:

- zest from 1 of your lemons - about 1 tbls worth (this lemon will also need to be juiced, so do these two things in whichever order you feel you need to)
- 3 thyme sprigs
- all 1.5 cups of your sugar
- all 1.5 cups of your water

Bring these to a gentle boil, stirring a little if the sugar isn't dissolving. Reduce the heat and let simmer for 5 minutes. Then remove from the stove and let it cool for ten minutes.

Juice 4 of your lemons, including the zested one. Juice from 4 lemons equals about 8-12 tbls.

Slice your remaining lemon into pretty circles and wedges for garnish.

Strain your cooled syrup into your pitcher (this recipe assumes you have a 1L pitcher), add all the lemon juice and tequila. Drop in some ice cubes, lemon and thyme garnishes, and fill up with your sparkling water. Don't worry, you're almost there!

Now grab your glass, or glasses if you are being forced to share, and add desired garnishes and ice cubes. Then fill to the top with your scrumptious concoction!

Repeat daily for most divine results.

And don't blame me (or the other two girls) if you become addicted to these cocktails.


31 Days off Your Duff {Day 28} - Compliment Someone

Okay, Day 27's post is going to be short, sweet, and to the point. Just like a compliment.


Do you remember the last time you got an out-of-the-blue compliment from someone?

If you answered yes, then remember how that made you feel? Wouldn't you like to do that for somebody else?

If you answered no, then don't despair! Once you start complimenting other people, you start to feel better about yourself (funny how that works), which leads to you carrying yourself a little straighter, smiling a little more, and before you know it, BAM! somebody hits you with a compliment.

It's really a very simple concept. You can start small; just dole out one compliment a day.

I see a ton of the same customers on a regular basis, so I can tell when it looks like somebody took a little extra effort to look and feel nice. And I'll make sure to let them know it worked with a simple,

"That scarf looks great on you!"

"What a pretty haristyle!"

"I love the colour of your sweater!"

You get the idea. You don't have lie or rave about how gorgeous they are or say anything you are uncomfortable with; just give them something little. Because trust me, it won't feel so little to them.

So, today when you are out and about and off your duff, throw a few compliments around! It'll make both you and the recipient feel great about yourselves.

Tuesday, October 30, 2012

31 Days off Your Duff {Day 27} - A Berry Cream Treat

Have I mentioned I sometimes hate being lactose intolerant?

This little dessert/drink/snack thing is so delicious, but my stomach always hurts afterwards.... definitely worth it, but not all the time.

For those lucky people who can, go enjoy this!

Here it is

So amazing.

I'll take better pictures the next time I make it... this one is old.
But they don't make this drink taste any worse, so it's okay.


And so, so simple. Just four ingredients:

- Half -n- Half
- Frozen Raspberries
- Mint Leaves
- Sugar

Start with a pretty cup (it tastes better! It does!) and fill it just an inch or so from the top.

Plop in your frozen raspberries.

Pour some fine grain sugar on top... some days I don't add any, some days I add lots. Whichever you are up for!

Tear up and add some fresh mint leaves! I just did that part over the summer, and man was it the perfect addition!

Done! Enjoy with a long, fancy spoon.


Now get off your duff and make one of these! Now!


31 Days off Your Duff {Day 26} - Make Your Own Body Scrub

If you've ever looked into it, you know how easy it is to make your own body scrub.

The only controversial problems I've seen out there is how long it lasts and what measures you can to to preserve it. But unless you are planning on giving it as a gift, you needn't worry about that problem.

Side note: even if you do intend to give as a gift, just don't mix it ahead of time! Make cute jars or other containers to keep the separate ingredients in, and print out a cute recipe card. Problem solved!

As for yourself, the same thing applies; just make a fresh batch before you get in the shower or tub! It's really so simple, it'll take you about 30 seconds once you know what you like.

Here is what you need, although this is in no way a fully comprehensive list:

Carrier Oil

  • Jajoba - one of my favourites. Leaves your skin feeling so soft and moisturized.
  • Grapeseed - this oil has never really done anything for me for some reason, but it is a nice inexpensive oil that won't feel heavy on your skin.
  • Extra Virgin Olive Oil - A great, inexpensive, very common oil. However, make sure you get the right kind!
  • Sweet Almond - Here's one that I usually have in the house. If I'm out of Jajoba, I'll use this. It is inexpensive and light.
  • Avocado - I haven't used this on my body yet, but I am loving it for my face. It makes my skin soft and glowing.

Scrubby Part

  • Salt - something fine-grain is best, so it doesn't rip at your skin. I have a really nice pink mined salt that I love. Salt will kind of dissolve in your oil, so you may need a little more than you think.
  • Brown Sugar - a very inexpensive basic. Nice for sensitive skin, and holds its own in the oil

Essential Oil (not strictly necessary, but great for your body and a nice aromatherapy session)

  • Mint
  • Orange
  • Lavendar
  • Rosemary
  • Tea Tree Oil
  • Lime
  • Etc. etc....

Once again you can't really go wrong here! Pick your favourites from each category, mix it up, and enjoy!

As with OCM, I love keeping these ingredients separate so that I can choose what I want/need each time. Some days I want lots of exfoliation, so I put in some extra sugar/salt. Some days I'm mostly looking for hydration, and I'll put it about equal amounts of oil and scrub. And of course, some days I want to smell a particular scent, so I just go crazy.

Here are two of my favourite recipes thus far:

Sweet Orange Brown Sugar

Brown sugar and Jajoba Oil in about a 2:1 ratio, 2-4 drops of Sweet Orange Essential Oil.

This is a very calming, soothing scrub that I really love to use now in the colder weather.

Margarita Scrub

Ahhh this one is invigorating.

Fine grain salt and almond oil in a 2:1 or 3:1 ratio, depending on how quickly the salt is dissolving. 3-5 drops of Lime Essential Oil.

Warning: don't use right after shaving, unless you like burning legs!


There you have it! Making your own body scrub is incredibly easy, and can be extremely inexpensive if you want. There is no excuse; don't deny yourself this treat any longer!

Let me know about any recipes you already love/discover that you love!


Friday, October 26, 2012

31 Days off Your Duff {Day 25} - Plan in Advance

Yes, plan in advance is redundant. But I really mean it.

This is kind of part two to Do What Makes You Happy.

If you have found what you can do to make yourself happy, then great! Good job. But now you have to stick to it. If this happiness requires you to learn a new skill/habit, then I'm talking to you right now.

I know my big problem, when starting something new, is getting overwhelmed early on. Last year I got some Poi balls to start learning that form of dance, and there were so many things out there that I could learn to do! Unfortunately, I couldn't do any of them just yet, and I got so buried in the possibilities that I just let it paralyze me.

Don't let that happen to you! Plan out your learning... well in advance! Before you even touch a crochet hook/poi ball/guitar/etc.

My Plan

For instance, I started crocheting this month. Now there's a hobby with possibilities I could easily get lost in. But, I knew I had a weakness for that, so I planned it out a little better than I did my Poi.

My goal is to eventually make my own patterns and sell my crocheted items. And I am terrible at reaching goals with no definitive time frame, because I just want to be there now! So, I told myself that I had 1 year to become good enough to sell my work, then I'd put up an etsy store - just in time for Christmas!

Another limit I gave myself was about stitching. I said I would spend a week just practicing different basic stitches, over and over and over again. I knew if I didn't understand what I was doing the first time I read a pattern, I might get scared off. So for the first week (or just the first 3 days.... my impatience still kicks in a little bit!) I would stitch squares or circles, undo them, and start all over again.

So you get the idea! If you are like me at all, you should plan ahead of time. Just pretend you are about to start a new class, but write your own syllabus. Think to yourself,

"For my first [crochet] class, would they have me jump straight into a [cupcake hat], or would they have me practice some [single crochet stitches] first?"

And on and on. Find the online resources or books that are necessary, plan at least a month of "classes," and make it very specific:

"On October 28th, I will read and complete the [crochet pattern] on page 13."

Once you've completed your course, re-evaluate your skills from there. If you find it necessary, then make a second month of classes that build upon what you have learned.

So whatever fun skill you are about to begin; plan, plan, plan in advance!


31 Days off Your Duff {Day 24} - Yogurt Sandwich

Hey, remember all that yogurt we just made? I know you have some in your fridge now.... right?

Well, it's perfect as the spread for this delicious sandwich.

Yogurt-Fruit-Cheese-Salad Sandwich

Okay, I couldn't think of a proper name to go with this sandwich, and Ashleywich just sounds stupid.

But regardless of what you call it, this is a delicious sandwich. Here are the ingredients I use!

  • Bread
  • My homemade yogurt
  • A red apple
  • Feta cheese crumbles
  • Dried cranberries
  • Homemade vinaigrette, or just some flavoured vinegar
  • Kale
  • Flax seeds, chia seeds, all kinds of healthy seeds

1. Cut the apple into thin slices
2. Mix all your seeds in with your yogurt before spreading it on
3. Make a sandwich (I think you can handle that part without a description)
4. Sprinkle with delicious vinaiggrette/vinegar
5. Eat and/or serve!

I love these sandwiches so much. And if I'm going to make it ahead of time, I just put all the little or liquid ingredients in their own tiny, stainless steel, lidded bowls that I have. Then I put those and the large dry ingredients together in one big Tupperware container.

Now get off your duff and go make and name this sandwich!

31 Days off Your Duff {Day 23} - Stuffed Mango Chicken

This is a recipe my boyfriend made several months ago.

There's really not much to it; you could easily make it tonight, if you flit off to the grocery store first.

You'll need:

  • Mango sauce of some kind (or make your own!)
  • Chicken breasts to feed everyone
  • Bell peppers, preferable in a variety of colours
  • Pineapples
  • Whatever side you want - I think we had rice.

Lay the chicken breasts out on the counter, and then pound at them with a meat tenderizer until they have flattened some and about doubled in width. Then put the bell peppers and pineapples on top with some mango sauce, and fold the chicken over as if it were a taco.

Next just put them in a cooking pan, cover in lots of mango sauce, and cook at 375° for about 25-30 minutes. Your chicken needs to reach 165° to be safe for consumption.

That's it! If you want more food of course, just make a side of rice, salad, or whatever you prefer.

Now get off your duff and cook your own dinner!


Thursday, October 25, 2012

31 Days off Your Duff {Day 22} - An Alternative to Letting Your Child Gorge on Candy

Where has time gone? I've been doing this blog challenge for three weeks now, and Halloween is just about here.

Oh boy. Tons of children running around on sugar highs. Doesn't that sound exciting?

Well, my parents never thought so. Thus, they devised a plan that would limit our candy intake, but still make Halloween an incredibly exciting event for us!

But Ashley, what was that plan?

Well readers, each year we would all sit down and come up with a list. This list would encompass all possible candies that we would gather, from M&M's to obscure items we would never see again. Then, we would assign each candy a value - nickel, 2 nickels, a whole dollar, etc. - and that would be the amount of money our candy would earn!

I don't have any of our original lists, but here is a mock-up for you to see:

  • Candy Bar, small - 10¢
  • Candy Bar, large - 20¢
  • M&M's, small -
  • Almond Joy - 25¢
  • Sweet Tarts - 50¢
  • Unique, Strange, Amazing Candy - $1

You get the idea. Candies that were my parents' favourite were worth more, and crazy unique candies were worth a lot just for the novelty (one time I think I had sweet tarts in the shape of an airplane somehow... that earned me extra!).

So armed with the knowledge from our list, my sister and I would set out into the night. If someone offered us a big bowl of assorted candies, we knew exactly which one to grab. We knew to be excited when a package of sweet tarts or skittles were deposited into our bag. We also knew which candies we could afford to eat in between houses to keep up our energy.

Then, at the end of the night came the most exciting part; dumping our candy all over the floor and totaling it up. Once we were ready, we turned it all in and our parents gave us the money - one year I made over $30! I still have the steel dragon statue I bought with those earnings.

So whether you want to take away your kids' candy for their health, for their safety, for your sanity, or just for the sake of making some new memories, go grab some paper and start making a list!


Tuesday, October 23, 2012

31 Days off Your Duff {Day 21} - Etching Your Own Designs

Hello everyone! Today I thought I'd share another of the projects I did over the summer; etching my own glassware.

This has so many amazing possibilities, but sadly I've only accomplished one so far. Even so, I am very pleased!

Supplies


Over the summer I started steeping some vinegar and herbs together to make my own all-purpose cleanser, but I had no container special enough to put the finished project in.

Luckily, there exists this amazing etching cream that would allow me to design my very own container out of an ordinary bottle. I needed only a few supplies:

  • Glass Bottle - easy, as I recycle dozens of flavour bottles from my shop every week
  • Spray top to fit on my bottle - I got lucky; the first cheap spray bottle I bought fit perfectly
  • Etching Cream - had to buy a gigantic tub of it for about $22 from my local building supply store
  • Brush - got a sturdy one at that same supply store
  • Protective Rubber Gloves - again, same store
  • Clear Contact Paper - grabbed a huge, exciting, useful roll at Michael's!

Now, I believe I got this fabulous idea from Kelly over at ImperfectHomemaking. She used clear contact paper for some label work she had to do (although she prefers vinyl), and after some experimentation I got it to work for my etching.

Doing the Deed


So, I boiled my bottle to sterlize it, and got to work cutting out shapes from my contact paper.

That was by far the worst part. I tried printing the shapes I wanted onto it - worked great, until I realized the ink never, ever dries, and instead smears the moment you touch it.

That was a failure. Next.

I attempted to draw my shapes onto the paper, then use an exacto to cut them out. Yeah.... that might work on giant, bold cuts, not on the fine ones I needed to make. The paper just scrunched instead of cutting.

Another failure. Fine, I'll do things the hard way.

So I got scissors, and gave myself hand cramps cutting out tons of different sized squares. I was trying to do patterns that involved larger squares around smaller squares around smaller squares, so of course the sizes had to work well together. Not as easy as it sounds.

Eventually, after tons of wasted contact paper (good thing it's such a large roll!) I got enough usable squares. After a little celebration, I got to work on affixing the squares to the bottle - a task that proved only mildly difficult at times.

After that, I just needed to carefully apply the cream with my brush and wait while it worked it's magic!

Just be sure you actually wait patiently. I rinsed all the cream off way too early in my excitement, and hardly had any results. The next time I waited the instructed amount of time, and it turned out much better.

Again, as I wasn't exactly preparing for a blog at the time of this bottle's creation, I don't have any pictures. I would take one now, but of course, the bottle is still packed away in storage.

So instead, I guess you'll just have to get off your duff and make your own to look at!


31 Days off Your Duff {Day 20} - Fudge Brownies

Yum, fudge brownies always sound delicious. Sadly though, they too often just taste like cake.

One of my friend's mothers made good fudge brownies once, and I think she used pudding, but I'm not really sure.

So one day I decided I was sick of the un-aptly named brownies, and would make my own correct version!

I don't even have exact measurements or times to tell you; it was all very experimental. I can tell you I made a simple brownie recipe from scratch, and a simple fudge recipe from scratch. And I mixed them together so they formed one perfect food.

First, I got the brownies made and cooking. Then, using my warped concept of recipe time, I tried to make the fudge so that it would just be ready to set as I pulled the brownies out of the oven. Shockingly, I mostly succeeded on that! Mostly.

My fudge was made on the stovetop, and is supposed to cook until it starts thickening up. Then you put it in the fridge to set. The brownies, you pull out while they are still just a little underdone, because they continue to cook for a few minutes. This was my goal; to mix the two together while they were each in their respective "setting" stage.

So, I simply scraped and pulled the brownies out of the pan and into another container, poured lots of fudge into them (but kept the majority of it brownie), and mashed it all together. Then I did put them in the fridge to set, even though I like warm brownies.

After all of this hurried work, I had success! My fudge brownies were delicious! I have to work out a few kinks here and there, but this is definitely a strong building block.

Friday, October 19, 2012

31 Days off Your Duff {Day 19} - Making Your Own Yogurt

Whoever thought you could actually create your own yogurt?!

Okay, probably a lot of people realized that, but I didn't until a few months ago when CrunchyBetty put up a post about it.

Unfortunately, her method just wouldn't work for me. Luckily though, I found some instructions elsewhere that worked great!

Look up here! Look up here! These fabulous instructions are from Michael W. Reeps.

Let's Get Started!

So first, you'll need to get all your supplies clean and ready! I use:

  • Stirring spoon
  • Double Boiler
  • Thermometer
  • ~optional~ Draining bowl and strainer (although that comes the next day)
  • A lidded jar (again, for the next day)
  • Milk (however much you start with = the amount of yogurt you will end up with)
  • Yogurt (yes, you need yogurt to make yogurt, unless you are currently growing your own cultures)Be sure it's a healthy, plain yogurt with actual live cultures! In my area, I love Zoi and Chobani, as they have the largest variety of cultures that I can find.

Boil all the equipment you can for about 10 minutes to get it good and clean.

Once everything is clean and dry, put your milk in the double boiler (top of course!) and heat until it reaches 185°. Keep it steady at that temperature for about 30 minutes, and then take the milk off to cool.

At this point you could wait for the milk to cool, or put the pot in a sink of ice-cold water to help it along. Either way, get the milk down to 110°. This is the right temperature for the bacteria in your yogurt to start lacto-fermenting.

So when the milk reaches 110°, stir in your yogurt. Reeps says to add 2-3 Tbs to half a gallon of milk, and since I never measure mine, go ahead and follow his advice.

Next, stir your yogurt/milk mixture, and then gently put it to bed.

By this of course, I mean cover it with a towel and keep in a warm, dry, dark space. A heating pad works great; just set it to medium and put the bowl on top. Just be sure nothing overly flammable is around!

Now, the longer you wait, the thicker and tangier your yogurt is going to get. Start your first batch at 7 hours, and work from there. I personally like mine to ferment for about 10 hours.

After that agonizing wait, you get to...... wait some more! Hooray!

You see, to halt the bacteria's growth (and also to thicken the yogurt up a bit more), you have to stir it and put it in the fridge - overnight. Oh boy. So next you stir the curdling yogurt in the bowl, pour it into your chosen container, and set it in the fridge.

After that though, your yogurt is ready to be enjoyed.

Unless of course you want to go through the extra special next step!

Make Your Own GREEK Yogurt

Yum, Greek yogurt is my favourite! Luckily, turning your yogurt Greek is the simplest part of all.

Just strain it, in one way or another. Cheesecloth or coffee filters will work. Sadly, at the time I took the following pictures, I only had paper towels... which do not work all that well. Unless of course you like the texture that paper towel bits add to your precious yogurt.


Look how fancy I got

Soaking up paper towel nutrients

The whey being strained out


Once your yogurt is as strained as you like it, put it back into the container. Keep that nutritious whey that you strained out though, and incorporate it into your diet somehow. I personally like putting it in smoothies, or being super fancy and freezing into ice cubes for the smoothie.


Important Note: If you haven't realized yet, I'll tell you now; this will greatly reduce the amount of yogurt you end up with. So remember back when I said amount of milk = amount of yogurt? That doesn't apply here. If you know you want to make Greek yogurt, go ahead and double the milk you start with.


Finally, your yogurt is ready to eat! You can enjoy it plain, put granola on it, make it into a sandwich spread, doctor it up with fruit or honey, mix it with pomegranate juice and freeze it into little drops, anything your mind can think of! Just be sure to set some aside as the starter for when you make your next batch.

All Done

All right! Check you out, you fancy creator of yogurt! Aren't you proud of yourself? I'm certainly proud of you!

Now take your duff out into the world and boast of your yogurty prowess!

31 Days off Your Duff {Day 18} - Do What Makes You Happy

By a show of hands, how many of you do something every day that truly makes you happy?

Hmm... well, I can't see you all, but I'm going to throw out a guess that not many of you raised your hand.

As a coffee shop owner, I see a lot of people every day. And the majority of these people seem to have the goal of just surviving until they get to go back to bed. Very few seem to actually be taking enjoyment out of their lives.

That's right about where I was the beginning of this year; lot's of personal things were negatively affecting my life, my beagle was diagnosed with cancer, people I cared about were having problems... some days it was indeed hard to enjoy anything.

But that's no way for any of us to go on living.

Make a List

Of course, some of us have problems even figuring out what it is that makes us happy. There are so many options available, it's hard to find what you really like!

That's why over the summer, I decided to write a list. This list would have no real order or reason; it would simply be the things that make me happy, make me peaceful, make me excited, anything that gets good feelings going. Afterwards I would look over the list to see if I could act upon anything that was there.

So, I got started. I won't name everything on the list, but here are a few items:

  • Pretty chocolates
  • Spots
  • Creating things in down time (I'll explain in a moment)
  • Rain
  • Shopping
  • Logic Problems

Now, after looking at this list, I decided I could easily start with Chocolatiering. I had always loved beautiful chocolate, the art of making chocolate, eating chocolate, all of it, and I finally realized that I should be doing something about it!

So I started making chocolates for my shop. Hooray! I loved doing that, but chocolate don't sell well all the time, so I couldn't make as many as I really wanted.

Ah well. I put that on the back burner right now. I may try and get a part-time job at a chocolate shop one day, but that isn't going to happen at the moment.

Finally Finding Something

I won't bore you with all the things I've tried from my long list, but suffice to say I have just picked up crocheting (this falls under the very vague "create things" item).

Instead, it's time for you to go make your list. Even if you are one of the lucky few who enjoy your days (hopefully with a good cup of tea!), it can't hurt to identify the areas in which you could enjoy yourself a little more.

So! Get off your duff and be happy!


Wednesday, October 17, 2012

31 Days Off Your Duff {Day 17} - Squash & Pumpkin Seeds

One of the best things about this season is eating pumpkin seeds! They taste so good, even with just a little bit of salt, that it's a great snack to whip up after a night of carving pumpkins.

This week though, my family finally used one of the gigantic squash from our friend's farm. We cut it up for a delicious soup, and my father thought to bake the seeds just as he does pumpkin seeds.

Turns out, they taste the same! Shocking, I know.


Baking the Seeds

This is another one of those recipes where you can't really go wrong unless you try.

The basics are:

- rinse seeds and set out to dry
- drizzle with a little oil
- cook at 400 degrees for 25 minutes, or until golden brown

It's up to you to jazz up the recipe! My dad always did just plain salt, and a couple batches were also blessed with cayenne powder. But you can get as creative as you want.

Here are some ideas:

- Garlic powder/ raw garlic
- Smoked Paprika
- Pumpkin Pie Spice (pre-mixed or your own creation) ((I'm hoping to try that one this year!))
- Salt and Vinegar
- Salt and Lime (this delicious-sounding idea just came to me... has anyone tried it?)

Of course, there are nearly endless other recipes. Tell me about the time you got off your duff and made a batch of seeds!

31 Days off Your Duff {Day 16} - Eggnog Pancakes

One day 4 years ago, I was making some pancakes that called for water to be added. (Yes, I was making them from a box... what can I say? I had just moved out of my parents' house)

Now, my mom always said to substitute milk for that boring water, and you would get creamier, fluffier pancakes. That is exactly what I planned to do, until I opened my fridge and saw:

Eggnog.

I way too enthusiastically calmly pulled out that delicious jug of thick (virgin!)eggnog along with the jug of milk. I poured in about 80% eggnog, 20% whole milk.

I then proceeded to cook my pancakes as normal, flipping when the edges started to bubble, all that good stuff, until it was finally time to take my first bite!

Never had I felt that my brilliance was so strong. Those were the best pancakes I had ever had.

And you know what makes them even better? A little sprinkle of cinnamon onto each little circle of batter as it cooks in your pan. Yum.

I am so excited that Fall is here, and it's time once again coming time for these amazing pancakes.

Tuesday, October 16, 2012

31 Days off Your Duff {Day 15} - Make Your Own Energy Bar

Sorry, super-quick, pictureless post, as I'm still sick!

Throwing Together a Bar

This summer, a few of us went out hiking for a week. Instead of loading up on nutritious (yet sugar-laden) energy bars, we decided to make our own beforehand! This way we could control exactly what we were eating, and we could cut down on the waste that we would be toting around on our backs.

I apologize, but at the time I made these, I was not thinking I may one day put them on a blog. Thus, I sadly have no pictures, and nowhere near an exact recipe... but that's the beauty of DIY! You don't have to follow somebody else's instructions exactly, you just make your own.

But here, let me try to recall enough to give you some examples:

My Energy Bar

Bleh, I hate nuts. Gross, gross, gross. So naturally, I didn't put any in bars, hooray! Otherwise I would have had horrific stomach aches, and nasty tastes left on my tongue.

- Oats

The oats were the base of the whole thing, as with most bars.

- Pumpkin Seeds
- Chia Seeds
- Flax Seeds
- Sesame Seeds

Basically, any seeds I could get my hands on. They are so good for you.

- Various Dried Fruits

Again, we made our own dried fruit. No preservatives or added sugars, hooray!

- Raw Honey
- Melted Marshmallows

These made the stickiness that held everything together.

Okay, okay.... I know. Marshmallows don't really stick with my whole "Natural Energy Bar" theme here... but I got really excited part way through when I realized this was kind of like making Rice Krispie Treats... and I just couldn't help myself! But let me tell you; these were the healthiest Rice Krispies ever made!

My Boyfriend's Energy Bar

His I remember even less of, but let me make an attempt here, just to give you an ever-so-slightly different idea.

- Oats
- Various Dried Fruits
- Various disgusting Nuts
- Various Seeds
- Raw Honey
- Organic Molasses

Making Them Look... Pretty?

Once we were done mixing up our ingredients, we put them in between some foil sheets, and just smooshed everything down until it was flat.

We thought about cutting them into individual bar shapes, but just didn't get around to it in time. That's a definite possibility though!

Now, don't think these are just for hiking! You could easily make a batch of these, cut them into servings, and eat one every day. I'm sure they would freeze just fine too, if you made a huge amount (haven't tried it myself though).

So, get off your duff, and make some energy bars that will ensure you stay off your duff!

31 Days off Your Duff {Day 14} - Make Your Own Vinaigrette

Sorry everyone, I've been sick for a few days and not feeling up to working on the computer. I shall catch up to the 31 days today/tomorrow with a few quick recipes, as I'm still not feeling well.

[insert flavour here] Vinaigrette

Making your own vinaigrette is incredibly easy!

Basically, mix equal parts oil and balsamic vinegar.... and throw in whatever else you want.

Ta-daa! Done.

As for the particular one I just made, I mixed:

- 1 half Fresh Pear
- 1 Fresh Plum
- 4 oz. Balsamic Vinegar
- 4 oz. Olive Oil
- 2 Garlic Cloves
- 4 Rosebuds
- Black Pepper to taste (I like a lot, but this was for a party, so I didn't use much)

I mixed it all up in a blender, poured it in a 14 oz. cup, and put it in the refrigerator until I was ready to serve.

Yum, chunks of plum!


It tasted great!

.... until it fell and spilled all over the kitchen floor. But hey, vinegar is a great cleanser!

Saturday, October 13, 2012

31 Days off Your Duff {Day 13} - Yixing Clay

O for Oolong!

For the last day in my tea week, I shall talk about an item that every avid tea lover should have:

A Yixing Clay tea vessel (pot or cup).

I just finally got my first (of many), and I am so thrilled to start using it.

The outside of my Yixing Tea Traveler

What is Yixing Clay

Why, you ask, is this clay so vital to your tea experience?

Because, I answer, the yixing (pronounces ee-shing) purple clay is very porous and traditionally unglazed. This means that through continual use, the tea pot or cup will become "seasoned" with the flavour of your tea, enhancing each and every cup you drink.

It has been said that eventually, you don't even need to use tea leaves; the vessel will have enough flavour that you can just pour in some hot water. There are however plenty of people out there saying this is untrue, and it is too early in my Yixing experience to tell for myself.

Now since this clay absorbs flavour, you are supposed to only use one tea in it, or at least one sub-type of tea (black, green, Oolong, white, etc.). Otherwise your different teas may mix with disastrous consequences!

Extremely Brief History

Now, I've lost my book I was going to look up the origin from, but I faintly remember the facts.

The clay comes from a province in China called Jiangsu. It used to be made for creating artistic pottery, until one day some brilliant man thought,

"Hey, that would make a great tea pot!"

Of course, these teapots can still be called works of art. Each one is made by hand, and the artist leaves his "chop," or basically signature, on his creation; usually on the bottom of the pot, inside the lid, or both.

You can of course still buy these today, either old or new, cheap or expensive. Online and in certain brick and mortar stores, you can buy a yixing pot in just about any price range; from $20 up to... well, I don't know the most expensive ones, but I've seen plenty over $10,000.

My New Yixing

Now, since I'm way too on the go these days, I have not bought an actual pot yet. But I did just purchase a travel cup with the precious clay!

The outside is brushed steel, as you saw in the first picture, and the inside is made from Yixing clay.

This is not exactly a work of art, there is no "chop" in there, but it's good enough for an on-the-go tea drinker!

Since I'm hooked on some Milk Oolong right now, that's what I've been using. Which works, because this cup is from Teavana and that dragon is their symbol for Oolong anyway.

Oh also, this cup comes with a stainless steel strainer, for those who want to use it. I don't need it though; I just keep the leaves in the cup, drink all the tea, and pour more water over the used leaves. Oolong is good for multiple steepings, plus it sinks down to the bottom so it's not like I'm getting mouthfuls of leaves.


Have any of you ever heard of these teapots before? I think the ones in BBC Sherlock's "The Blind Banker" were Yixing, but I'm not sure.

I love Sherlock


Thursday, October 11, 2012

31 Days off Your Duff {Day 12} - Unusual Uses for Tea


Bleh, I got sick today. And since I didn't prepare a post ahead of time, this one will be a short, simple list about some different uses of tea.


Tried and True

- A substitute for water when washing your hair (softens hair and adds some shine)
- A substitute for water when washing/rinsing your face (I use green tea in the
  mornings, after drinking some of it, for just a light wash)
- Potpourri (lavender herbal "tea" is my favourite to smell)
- Freeze into ice cubes to add to any drink, blend into a smoothie, or rub all over
  yourself when you need a refresher
- Relieve and help to heal a sunburn (soak yourself in some strong black tea)
- Soak tired feet in black tea (works as a pick-me-up, plus lessens foot odour)
- Cook with it, of course! (As in Lapsang Souchong Salmon)
- Give yourself a psychic reading (whether you believe in your reading or not, it's fun!)

Heard About

- A natural fertilizer/compost
- Dry up poison ivy (black tea applied to the rash)
- Eliminate odours in the fridge, litter box, carpet, shoes, etc.
- Polish wooden furniture (use a cloth soaked in tea)
- Shine mirrors (rub with tea bags or spray brewed tea - I really want to test this one soon!)
- Soothe tired, puffy, or infected eyes (place a wet tea bag on your eyes - simple, but I've yet to try it!)
- Age sheets of paper (dip the paper in black tea; when it dries, it will look antique - I always forget
  about this one)

Back to Resting...

Don't be fooled; there are oodles of other uses you can get from tea. These are just the ones my sick mind could think of.


Now, I'm getting back to drinking my green tea with raw honey. Yum!

Feel free to tell me about some uses that I missed!

31 Days off Your Duff {Day 11} - Sewing Your Own Teabags

Reason

One of my friends had just moved away when I decided to start selling full-leaf tea at my shop. She was very disappointed, as she loves tea and we had such an amazing variety here.

This got me wondering what kind of container I could send her several samples of teas in. As I had just recently discovered Pinterest, I was developing a very DIY mindset, and thought,

"Hey, wait! Surely I can just make my own teabags!"

So, I googled making your own teabags, and this cute little blog came up with just such a post.

A Beautiful Mess

All I needed was some thread, coffee filters, and something to dangle on the string. Easy! I had all those already.

Making the Bags

So I got to cutting out my coffee filters. I did all different shapes by just cutting two filters at once, and keeping the identical pieces together.

Next, I stitched them nearly all the way closed, leaving a hole for stuffing tea.

Now, don't make the same mistake I did at first: I didn't want to staple my strings to the bag, so my plan was just to leave a tail of thread when I was done. However, that means you need to end the sewing at a specific point - the place you want the string to actually hang from. As you can see from the pictures below, when I was finished sewing the heart my string ended up randomnly along the side somewhere.

After figuring that out, I was a little smarter with the rest. Once I had done most of the sewing on a teabag, I stuffed in about a tbls of tea, then finished up my stitches.

Lastly, I stapled the tail of the string to a matching cut-out shape, tied a knot around the staple, and ta-daa! I was done.

See the little stitched smiley face at the top? :)

Now, when you go to make your own, make them much bigger than I did. (For some reason, I have always had this mental block towards making things on a large scale) Full-leaf tea deserves to be free, so it can swirl around and properly infuse the water with it's goodness. A teabag is already going to inhibit that somewhat, so try to lessen the restriction as much as possible.

After that, just enjoy!

Tuesday, October 9, 2012

31 Days off Your Duff {Day 10} - Lapsang Souchong Salmon

Last week, I noticed that my shop's supply of the smokey Lapsang Souchong Tea was getting pretty low. I was just about to put it back, wondering how soon until I sold the last cup of that tea, when a great idea struck!

I should marinate some salmon in this tea! Brilliant!

Hooray! I love great ideas, and I knew this was a good one.

Implementation

Friday afternoon I took out some fish to thaw... and saw that I had 1 salmon fillet left, and 1 tilapia. I was skeptical about cooking the tilapia in my Lapsang, but I did it anyway just for sake of the experiment.

After the fish thawed, I put them in a little bowl of my steeped tea and let them soak it up for a couple of hours.

Steeping in tea!


Then, because I was worried that wasn't enough, I cooked them in all of that liquid too. On hindsight, I don't believe that was exactly necessary, but I'll have to see next time.

I definitely took them out at exactly 165 degrees... because I never overcook fish so far that it reaches 190, no, not every single time...

Results

Hooray, time to try the fish!


This is exactly what my finished product looked like

They were a little soggy as I poked into them with my fork, having been cooked in liquid... but that wasn't the point of this. I wanted to see if they actually absorbed the smokey tea!

The salmon turned out really well! Of course, I put absolutely nothing on it but the tea, so it could definitely taste better. BUT, the important thing is that it tasted smokey!

Salmon, success.

Tilapia.... I can't really tell you how it turned out. I took a bite - or maybe a drink, I'm not sure. It REALLY didn't like being cooked in all the liquid - I gagged, and immediately shoved the memory of the experience out of my mind. It was so awful.

Tilapia, no. Just don't do it. No.

Conclusion

My results state that:

"Everyone should get off their duff and try some Lapsang Souchong Salmon!"

Just be sure not to boil it in liquid, and go ahead and spice it. Oh, and don't cook it to nearly 200 degrees.

Not that anybody would do that.

31 Days off Your Duff {Day 9} - TeaMind

Mmm, tea leaves are beautiful.

Okay, so this post isn't exactly about getting off your duff... it's more about sitting right down on it and relaxing!

Now, I don't mean relaxing like "I'm going to watch TV and laugh at other people's misery for a while." I mean relaxing like taking a few minutes for yourself to calm down, put your mind at peace, and really savour something.

You know what works perfectly to help you achieve these precious moments? Tea.


"The whole problem with civilization is that we've been trying to squeeze the mind into the brain and it won't fit. The great Gift of the Leaf is that it relaxes the brain, freeing it to float to its true home in the boundless and inexhaustible - the sublime state we call TeaMind"

-The Minister of Leaves, quoted from Republic of Tea's book Tea Chings


The Wonders of Tea

Tea is an extremely healthy drink for the human body. It has a few good vitamins, and green tea especially has the highest health benefits; it is full of more than 30 polyphenols ( a kind of antioxidant).

If you start looking into it, you can read about all kinds of studies that say tea does things like:

- reduce your risk of several types of cancer
- improve the health of your teeth (tea naturally has some flouride)
- provide you with more energy (we knew this one)
- lower your cholesterol
- soothe your aching stomach (again, you probably knew that)
- help sunburns to heal and stop hurting (you are supposed to steep yourself in a bath of black tea)

There almost seems to be no limit to the benefits one can get from tea!

I'm also convinced that tea makes you a happier person. If you noticed my little "About Me" over there, you'll know that I own a shop that sells tea. I have to say that rarely, do I get a tea drinker who is angry or frustrated.

Tea is made to be sipped and savoured, and I believe most people can feel this. It makes you slow down and appreciate life. As Republic of Tea says, enjoy life

"sip by sip rather than gulp by gulp."

Monday, October 8, 2012

31 Days off Your Duff {Day 8} - How to Beat Motion Sickness

As you may or may not have noticed, I did not post this on time yesterday. That would be because I was riding in a car, and I get very sick when I try to focus on something inside the vehicle. Just entering the car makes me feel a little nauseous.

However, a realization struck as I was thinking about my blog on the way back home. I had just eaten dinner, and was sitting staring out the window wondering if I would have the energy to write something when I finally got home, when it hit me; I wasn't feeling that little hint of nausea!

As I thought about it, I eventually came to the conclusion that having food in my stomach was the deciding factor here. When I had started the car ride, I was hungry, and therefore very susceptible to nausea. On the way back, my stomach was nice and satisfied, thus leaving me feeling just fine!

Finally, after two decades of misery, I noticed there was a hunger-to-motion-sickness ratio. Awesome.

Other Natural Ways to Combat Motion Sickness

- Eat mint; mint leaves, mint gum, mint tea, whatever you want
- Eat ginger; again, real ginger, ginger mints, ginger tea, etc.
- Apply pressure a little below your wrist, between your tendons (allegedly a nausea-controlling
  pressure point)
- Get up out of that car and walk around (there, this counts for a getting off your duff day, right?)
- Crack the window for some fresh air and a chilly breeze, both of which help me if
  I'm not too far gone


Don't forget, it's okay to walk a mile or two (or more, if you're up for it!) to your destination. The best way to beat motion sickness is to carry yourself with your own two feet!

Saturday, October 6, 2012

31 Days off Your Duff {Day 7} - Just Get Up!

Because I have a busy day today, and didn't plan ahead, today's post is going to be short and sweet. It's about the greatest struggle I have in my life:

Getting out of bed.

Everything else, I can shrug off or eventually find a way to deal with. Getting out of bed? That's a horrific, internal battle every single morning.

BUT! There is hope for people like you and me...

Just do it.

I know, this sounds like terrible advice, or not even advice... I've researched techniques or asked friends before, and I remember a lot of,

"You just have to make yourself do it!"
"Set your alarm for the same time every day!"
"Have a schedule you must adhere to!"

Hmm, helpful.

But you know what? One day not too long ago, I started doing just that.

My alarm would go off... and I just got up. Wow!

Tips

Well, I was going to give you my newfound wealth of tips to make this a little easier, and I looked it up online just to see if I was as smart as I feel.

Nope. Turns out GeekDad kinda beat me too it... a long time ago. Where was this article when I was searching for help?

Anyway, you can go check out his humorous post, but here is my list of tips as well.

Don't keep your alarm next to your bed.

When my alarm was right beside me, I could just turn it off and not realize I had even woken up. I moved it away from me, and that has definitely made things easier; its not as hard to keep from going back to bed, as it is to get out of bed.

However, I may be moving it even farther soon. My morning self has realized that she can kind of slither and stretch to reach the alarm without fully leaving the bed.

Sneaky woman.

Get your clothes ready beforehand

WOW, it was always stressful for me to stumble around, half-conscious, and pick out sane outfits. Once I finally got something together, usually 20 minutes had passed and I was already frustrated with my day.

Picking something out the night before is fun, takes 6 minutes, and I can look forward to wearing it when I wake up.

Tea

Ooh, tea. I love tea. With all that outfit-choosing time I've saved, I started making a little cup of tea in the mornings. It's important for me to have that tiny bit of alone time before I go to work, I've come to realize. And again, having something to look forward to makes getting up all that much easier.

Bathroom

This is where I was really laughing at GeekDad's post. He said he gets tons of reading done in the bathroom, and looks forward to doing so in the mornings.

I guess I do kind of the same thing. The bathroom is usually good for more time alone; half the time that's why I'm in there in the first place.

After I've gotten up, I'll give my eyes a few minutes to un-blur as I check the couple of things I need to on my phone. THEN, it's off for tea!

Exercise

This is my last tip, but it's a very important one. If you are like me, it can sometimes take hours to expel that tired feeling out of your head and muscles.

However, I've recently started exercising in the morning. The moment I turn off my alarm, I drop down and do 10 pushups. The rythmic moving tries to put me back to sleep again, but it loses out to the muscular wake-up call.

I will then do 10 reps of squats and one other miscellaneous exercise. Then, I start my tea water boiling, do 10 more reps of each, and it's off to the bathroom!

All Done

There you have it. This didn't turn out to be that short, but oh well.

As I've just given you all my morning wisdom, I have nothing exciting to say for the ending. It's up to you now!

Get off your duff and... well, just stay that way! No going back to bed!

Friday, October 5, 2012

31 Days off Your Duff {Day 6} - OCM (Oil Cleansing Method)

Again, here's a really popular idea that is spreading around the world. But I can't have a blog without talking about OCM!

The Idea Behind OCM

In case some of you haven't heard yet, the Oil Cleansing Method is like the no 'poo of the face.

Basically, typical face washes strip your face of its natural oils, which causes it to overproduce oil for the rest of the day. The exfoliating face washes are actually pretty harsh on your skin, and will often leave tiny little abrasions on your face that you can't see with the naked eye. Mm, infection, anyone?

A lot of people, myself and boyfriend included, have decided to ditch the harsh, chemical-laden face washes and start cleansing the natural way!

But What Oils to Use?

What's fun about the OCM is there are so many options to choose from. Your most typical oils are:

- Grapeseed Oil
- Almond Oil
- Jajoba Oil (good for acne)
- Olive Oil (be sure it's actually, truly extra-virgin! See CrunchyBetty's amazing post about that here.)
- Sunflower Seed Oil
- Avocado Oil
- Tamanu Oil (not a typical one, but a good, expensive, face-loving option.)

You can't really go wrong here. Feel free to test all the oils, give each a couple weeks to get the full effect, and see which your face likes best.

My boyfriend and I have so far tried Grapeseed, Almond, Jajoba, and we just bought Tamanu. He has a dry, acne-prone face, and I have combination skin that likes to get little white heads sometimes, and so far we actually both prefer Jajoba oil (the Tamanu is too new to tell).

So those are a few of your options for the carrier oil. The oil that is actual going to get your face clean is castor oil. Typically, people use 1/3 castor to 2/3 carrier. But again, test the ratios and see which your face likes best.

Everywhere I look, people find out what ratio they want and then mix all their oil together in advance. I personally don't like that idea; I have a pretty little bottle for my castor oil, since I buy it in bulk, and I keep the carrier oil in whatever bottle it came in. That way, I can change it up as I see fit; if I had a particularly dirty day, I can use a little more castor oil than usual. Plus, my boyfriend and I use different ratios, so we just find it easier to keep the oils separate.

Time to Wash!

So now that you have your oils ready (you do, don't you?), you can go wash your face! It'll be near impossible to wipe the oil off unless you have a washcloth, so bring one of those with you too.

I'll walk you through my routine:

1. Pour the oils into my clean hands
2. Turn on the water to let it heat up while I...
3. ...Start massaging oil into my face
4. Keep massaging for about a minute
5. Wet my washcloth in the hot water
6. Drap cloth over my face until it cools, about 20 seconds
7. Wipe away oil (be sure to get your difficult jawline!)
8. Repeat 5-7 three times
9. Marvel at how fresh, clean, and soft my face feels

That's it! It's a nice calming routine, as the warm cloth feels really nice draped over your face. Take that total of l minute to clear your mind of the day's worries and calm yourself.

The End

Alright, there you have it! Don't be afraid to wash your face with oil; it makes you feel very clean, I assure you.

As with anything else, give your face a few weeks to adjust. It's used to being stripped and covered in chemicals, so it may not know what to do at first. As with my hair though, my face was so ready to stop using commercial products that it just flourished immediately (I know I'm extremely lucky; don't hate me).

Even if you start to break out, don't worry right away; some people just have so much dirt and grime under their skin that regular cleansers ignore, and the oil is going to extract those.

Good luck! Get up off your duff let your face know that you love it!