I am very proud to be writing this post. You know that stereotype that women know nothing about vehicles? Well unfortunately, that is me. I can spot vehicle colours; I can tell the body difference between a little car and a pickup truck; I know what a camper shell is. Done - that is the extent of my vehicle knowledge.
But that's been changing since I recently purchased my very first vehicle - a 2002 Chevy Trailblazer.
The Problem
If I haven't mentioned this before, I am a fantastic destroyer of electronics. All I have to do is touch a phone, computer, tablet, etc. and its performance immediately plummets; on my unlucky days, it just breaks altogether (I apologize to one roommate in particular).
This is a real phenomenon, I'm not alone! Any of you cursed with this destruction?
Anyway, I say this because at the time of the incident, my boyfriend and I had owned this vehicle for nearly two months, with him as the primary driver. The one day when I drove it for, I don't know, about the fourth time, I was not at all surprised by the fact that it decided to suddenly act out against me.
As soon as I started the car, I could feel it shuddering abnormally. The shuddering was worse when idling or braking, and the poor thing hardly had enough power to make it up to 30 mph. Sorry, Trailblazer.
I did some research that day and decided my problem sounded like a bad ignition coil. I don't know if that counts as an electronic (poor vehicle knowledge, remember?), thus making it subject to my destructive touch, but nonetheless it still managed to break the moment I turned the key.
Anyway, more research brought up the fact that this would cost me over $600 to have fixed. Um, no! Luckily, being the savvy chick that I am, I was determined to figure out how to surmount this issue ourselves.
Sure enough, another search brought up several helpful videos for my needs.
The Solution
Now, I won't offer up a thorough tutorial here; I suggest watching videos if you need to take on this project, because they do a really amazing job walking through the process and I won't pretend I can do better. My post will serve more as a refresher once you already know what you are doing - I'm sure I'll be using it myself in the future.
Step 1. Gather a ratchet, a screwdriver, and your code reader if you have it - we have one that works with an app on our phone to tell us the exact meaning behind that pesky "check engine" light.
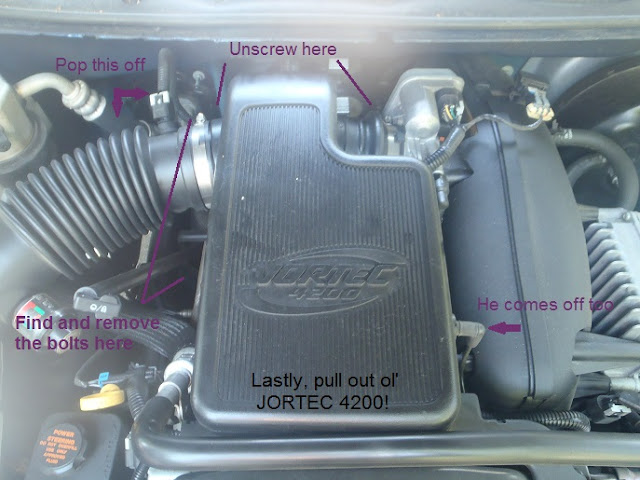
Step 2. Remove everything that is holding in this big plastic thingy.
Step 3. Hello there, ignition coils! To remove one of these guys, you need to unplug it and take off one bolt. Here are a few pictures to prepare you:
.
Step 4. If you have a code reader, then you can easily test the coils before replacing them. To test the coil you think is broken, simply switch it out with another one and get a new code reading. Our first reading said there was a misfire in #5. So, we switched that coil with #1 and went for a drive until the engine light came back on. Our new reading brought up a misfire in #1 instead, affirming that it was indeed the coil that was bad, not something else in slot #5.
Step 5. Just plop in the new ignition coil and put everything back together. Done!
30 Minutes and $600 Worth of Labour Later...
This was such an easy fix. Anybody who is capable of using simple tools can do this themselves, whether or not they have any prior vehicle experience. But the best part? It only costs one trip to the auto store (or a shipping cost) and a $70 ignition coil. That's a savings of $530!
It's been a couple months now and even though I've driven it several more times since, our Trailblazer is still running smoothly! Wish me luck for that to continue.
Now, is there anyone willing to pay us that $600 for our labour?


